Showing posts with label home. Show all posts

Sunday, October 20, 2013

New disk for an old eee-pc


Our trusty eee-pc 901 was getting slower and slower. The 16G SSD in it was not very fast to begin with, but has definitely become slower over time. To keep the otherwise nice laptop running for a few more years, I decided to upgrade the SSD. The drive I ended up buying a 64G Super Talent FPM64GLSE. RunCore disks have a reputation for being faster, but they were also more expensive and hard to obtain. The eee-pc requires a PCI-E disk. There are also newer mSata disks available. These use a physically similar connector as PCI-E, but are not compatible.


A quick test of the Super Talent with iozone yielded the following results, in KB/s. The same settings were the same as when measuring SD card performance on the raspberry Pi earlier,
./iozone -e -I -a -s 50M -r 4k -r 512k -r 16M -i 0 -i 1 -i 2

                                   random random
reclen write rewrite   read reread   read  write
     4 17258   20110  12626  12623  12528   1457
   512 74590   41339 127710 127909 121887  74354
 16384 40403   75312 129705 129748 130483  40077

As with SD cards, the speeds that the manufacturers specify is the rate of sequential reading or writing of large contiguous blocks (Reading max 150 MB/s, writing max 100 MB/s is what they specify). Randomly writing small blocks of data is a much slower. Still, I am pleased with this result. Also in practice the upgrade had a large effect, the laptop feels much more responsive.

An annoyance with this drive is that it is configured as a slave. When booting the eee, it complains that no master disk is present and demands to press F1. When F1 is pressed, the boot proceeds normally, the unnecessary message just prevents the machine from booting unsupervised.

I installed Linux Mint Debian Edition on the new drive. I had Ubuntu 11.10 before, which started to show its age. I decided not to upgrade it, after experiencing Ubuntu 12.04 on another machine - I felt that the upgrade to 12.04 broke the user interface.

I am happy with Linux Mint. However, I came across a couple of problems during the installation. One that looked serious was that GParted reported errors about a recursive partition on the newly installed disk. I could not get rid of this message but decided to continue the installation anyway, and it turned out fine. To reduce the disk writes and the wear, I added noatime to the mount options for the disk in /etc/fstab.

Thursday, September 26, 2013

A more classical anti-ad sign


Making a "no ads please" sign from Hama beads. This time, I'm trying out a more elegant and old-fashioned type design, with muted warms colors. This is the one I made for our own door.

The text is 20 Reddish Brown and the background is 21 Light Brown. I also put a frame with the "gold" color, not that that really showed in the final stage.


Tuesday, April 9, 2013

ISDN adventures


I have an ISDN internet connection. It is slow, but happens to be provided for free. Getting ISDN set up under Linux has usually been a challenge for me, so when I got a fresh install working today with very little effort, I wanted to document the steps. Once it starts working, it usually works fine. (Special greetings to everyone in the University guest house in Marburg. Ask for a DrayTek modem and not the Fritz modem, which is a real pain when running Linux. Say you have ein Apple Computer).

The modem is a DrayTek miniVigor 128 (USB ID 0675:1688), a small box which connects to a USB port on the computer and to a phone for the phone line. The computer runs Ubuntu 11.10 (but I have used the setup on other versions, up to 12.04 without problems).

There are two ISDN systems in use for Linux. I have used the older one, in particular the HiSax driver supports my ISDN modem. The newer system is called mISDN. The two systems cause a conflict when both try to control the same device. I solved this by blacklisting the mISDN module, to prevent it from being loaded.

Add a file to /etc/modprobe.d/, for example /etc/modprobe.d/blacklist-misdn.conf, with the following lines:
blacklist mISDN_core
blacklist hfcsusb

Install some packages. This is easy if there already is an internet connection...
sudo apt-get install isdnutils-base ipppd

while installing, the installation script for ipppd asks for some information:

  • phone number to dial
  • user name (at your network provider)
  • password
The installer script then sets up the following files:
/etc/ppp/pap-secrets   #user name, password
/etc/ppp/chap-secrets  #user name, password

/etc/isdn/device.ippp0 #phone number, etc
/etc/isdn/ipppd.ippp0  #user name, channel bundling, etc

At this point I rebooted, after that I could dial with
isdnctrl dial ippp0
and had internet access. Not bad. But at this point, the connection uses only one of the two ISDN channels. To double the connection speed to amazing 128 kBit/s, one must set up channel bundling.

Edit /etc/isdn/ipppd.ippp0. Uncomment the line #+mp, and add /dev/ippp1 above it. So:
/dev/ippp1
+mp

Create a new device file for the two bundled devices
sudo cp /etc/isdn/device.ippp0 /etc/isdn/device.ippp0+1

Restart the isdn service after changing the configuration files, to make the new settings active.
sudo /etc/init.d/isdnutils restart

Now, it should be possible to dial first ippp0, then ippp1 and use both channels for fast surfing.
isdnctrl dial ippp0
isdnctrl dial ippp1

Note: if you receive the message
ippp0: Device or resource busy
it might be because the line is already connected, possibly since the default setting is to automatically dial when there is network traffic.

If the connection works so far, some adjustments can be done in the configuration files.

Turn on compression negotiation - perhaps it increases the bandwidth a little.
Comment out the command noccp in /etc/isdn/device.ippp0, remember to copy to the other name as well:
sudo cp /etc/isdn/device.ippp0 /etc/isdn/device.ippp0+1

In /etc/isdn/device.ippp0, adjust timeout for terminating an idle connection. It's only 60 seconds as default. If you are lucky and don't pay per minute, set it to something higher, for example 1800. Change this line:
isdnctrl huptimeout ${device} 60

DIALMODE=manual (instead of auto) disables automatic dialing, and gives you control of when to dial.

For convenience, one can make two shell scripts for dialing and hanging up:
dial.sh:
#!/bin/bash
isdnctrl dial ippp0
isdnctrl dial ippp1

hangup.sh:
#!/bin/bash
isdnctrl hangup ippp1
isdnctrl hangup ippp0

The configuration file architecture is probably specific to Debian-based distributions, but the step of blacklisting mISDN should help on any Linux with both ISDN systems. I tried to get the ISDN modem working with my Raspberry Pi router as well, but I never got that to work.

Sunday, March 31, 2013

Masking & red cabbage dyeing Easter eggs

Easter eggs dyed with red cabbage

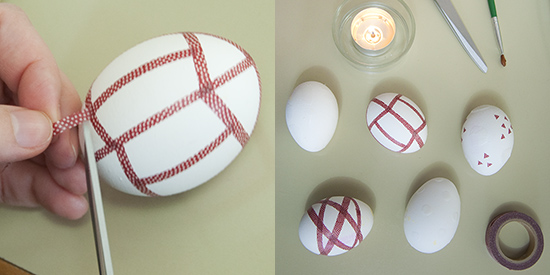
This year we colored Easter eggs with red cabbage juice. The patterns were made by masking the eggs with washi tape and candle wax.

Straining red cabbage

To extract the color from red cabbage, I boiled slices of five large leaves in water with some vinegar, for roughly 30 minutes, then removed the cabbage leaves by straining, and allowed the dye to cool. On the right is a piece of cotton string we boiled with the cabbage. It turned a very nice purple, I'm hoping the dye will stick to it.

Covering eggs with washi masking tape

To get patterns on the eggs, we covered some parts of them with washi masking tape. We also used molten candle wax, applied with a small paint brush.

Easter eggs soaking in red cabbage dye

The eggs were soaked in the cabbage dye for a few hours.

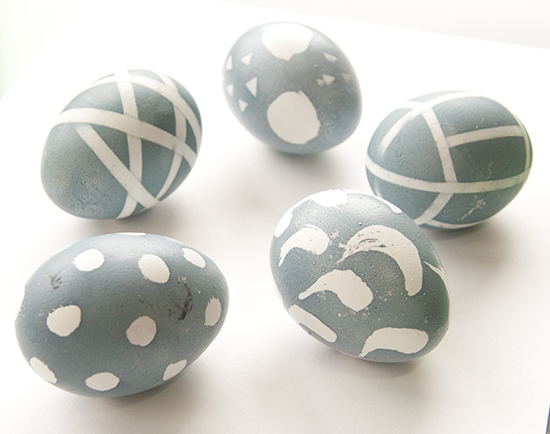
Dyed Easter eggs

Rinsing and removing the masking tape. The color is a nice blue, even though the cabbage was red and the dye purple! Red cabbage juice works as a pH indicator; it turns red when acidic and blue in alkaline solutions (and can even turn green or yellow for strong alkalines). It seems there is some chemistry going on in the shells.

The masking tape worked well - it kept the dye off the masked parts of the egg. Where two stripes of tape crossed each other an unexpected effect appeared: the upper stripe did not mask the egg perfectly just where it passed the lower stripe, giving an illusion of depth in the final pattern! The lines on the egg that appears to pass below another line were created where the tape stripe passed above another stripe.

The painted-on candle wax gave nice artistic effects!

Dyed Easter eggs

The finished eggs. Happy Easter to everyone!

Saturday, February 23, 2013

Mini lanterns on a LED series


I made a set of small paper lanterns for a LED light series we have on a wall (indoors!). The paper lanterns are stylish and easy to make - they are a standard type of origami called 'fusen', which means balloon. I learned about them from the book The Simple Art of Japanese Papercrafts by Mari Ono. These little cubes are inflated after folding, and the air hole was very convenient for putting the fusen on a LED lamp.


The ones I made for this project are quite small. I used 7.5x7.5 cm paper, and the side of the cube is always a quarter of the side of the paper you started with. Since the LEDs don't give off any heat, the small size is not a problem. The origami paper diffuses the light very nicely, and the colors of the papers show up very bright.

Best of all, the color scheme infinitely adjustable, just by adding and removing colors according to seasons, holidays and moods!

Tuesday, February 19, 2013

WiFi access point with Raspberry Pi

Raspberry Pi as a WiFi router

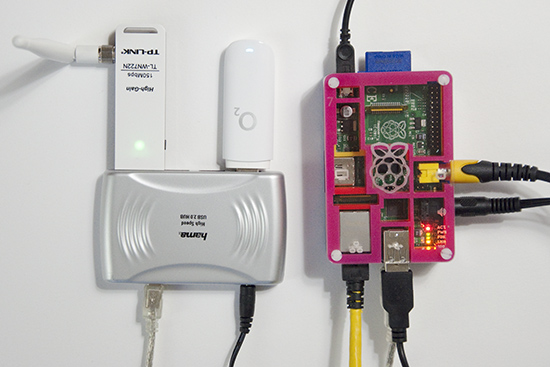
In a previous post, I talked about using the Raspberry Pi as a router. Now I wanted to add a WiFi device, and use the Pi as an access point as well. The Pi has three network interfaces: wlan0 is the newly added WLAN device, eth0 is my LAN, and ppp0 is a USB GSM modem connecting everything to the internet.

The primary reason for all of this is to have an access point for an Android phone. It turns out that an ad-hoc network is not enough - Android connects only to real access points (unless rooted and configured to be less suspicious). So the task now is to set up a Linux access point.

Software-wise, the access point functionality is provided by hostapd, which can be installed on the Pi easily.
sudo apt-get install hostapd
The hardware part is quite tricky though - not every wlan card works in access point, or managed, mode in Linux. The state of support in the various drivers can be found at  linuxwireless.org. Among the USB WiFi sticks, ath9k_htc seems well supported. I ended up buying a TL-WN722N, since it is supported by the ath9k_htc drier, and the external antenna looks efficient. It has worked very well so far, and is in daily use. Below, I describe the steps required for setting up everything. I am using Raspbian, but most of the things should work on any distribution.

The steps
Set up a DHCP server. Edit /etc/dhcp/dhcpd.conf and add the following lines.
subnet 10.10.0.0 netmask 255.255.255.0 {
range 10.10.0.25 10.10.0.50;
option domain-name-servers 8.8.4.4;
option routers 10.10.0.1;
interface wlan0;
}
If you already have an entry for DHCP on another subnet on another interface, make sure that the old subnet declaration also specifies for which interface it applies. Next, execute the following commands in a terminal, as root.

ifconfig wlan0 10.10.0.1    #bring up the interface
/etc/init.d/isc-dhcp-server restart #restart the DHCP server
echo "1" > /proc/sys/net/ipv4/ip_forward #turn on IP forwarding
iptables -t nat -A POSTROUTING -o ppp0 -j MASQUERADE #add a routing rule.

Replace ppp0 on the last line by the interface connected to the internet. For me ppp0 is a GSM modem.

Edit  /etc/hostapd/hostapd.conf . Add these lines (as a starting point):
interface=wlan0
driver=nl80211
ssid=YOUR_STATION
hw_mode=g
channel=11
wpa=1
wpa_passphrase=SECRETPASSWORD
wpa_key_mgmt=WPA-PSK
wpa_pairwise=TKIP CCMP
wpa_ptk_rekey=600
macaddr_acl=0

Next, start the access point by running hostapd.

hostapd -d /etc/hostapd/hostapd.conf

-d is for debugging output. -dd shows even more. Can be useful while setting up.

Now you should be able to connect to your new access point! Note that when hostapd quits, wlan0 looses it's IP address. So the IP must be set each time before hostapd is run.
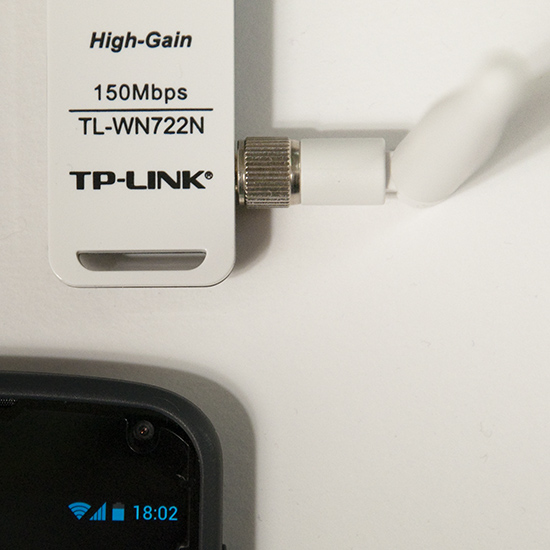
A TP-link TL-WN722N used as an access point

If everything works with this setup, it is convenient to automate the startup procedure, so that the access point is enabled at each boot.

To bring up wlan0 at boot, add the following to /etc/network/interfaces
auto wlan0
iface wlan0 inet static
address 10.10.0.1
netmask 255.255.255.0
To start hostapd automatically, add the command to /etc/rc.local:
hostapd -B /etc/hostapd/hostapd.conf
-B is for running in the background, as a daemon. Messages are logged in /var/log/syslog.

For setting up the IP forwarding stuff permanently, see my previous router post, and this nice guide.

So far I am very pleased with this setup. The only drawback is that the LAN on eth0 and the wireless network are separate and isolated from each other. Perhaps it's possible to construct a network bridge between the LAN and the WLAN interface. Then the two networks would appear as one, but this I leave for the next hacking session.

Add randomness!
Finally a note about a puzzling message from hostapd. When run with the flag -dd, hostapd works, but outputs
Add randomness: count=1 entropy=0
Add randomness: count=2 entropy=1
Add randomness: count=3 entropy=2
and so on, with a new line every second or so. I thought this had to do with /dev/random running out of random bits, but this is not the case.

Reading the source code of hostapd (version 1.0, since this is what I have on the Pi), this turns out to be a normal and harmless debugging message.  Hostapd keeps an internal pool of random bits (for encryption), in addition to the random numbers it reads from /dev/random. In different places in the program, random (or at least unpredictable) data is mixed into this pool. For example the signal strength of each received packet is used in this way. The "Add randomness" message is printed each time data is added to the pool. This is done in the function
random_add_randomness (const void *buf, size_t len)
in the file hostapd-1.0/src/crypto/random.c. So, in summary, the message can safely be ignored, and goes away if one runs hostapd without the -dd flag.

However, on a small system like the Pi, there is a risk of depleting /dev/random, especially just after a boot. I observed these messages from hostapd:
random: Got 18/20 bytes from /dev/random
random: Only 18/20 bytes of strong random data available from /dev/random
At this point I installed the program haveged,
sudo apt-get install haveged
Haveged is a program that helps with providing randomness or entropy, which it collects faster than the kernel does by default. I have not seen the message since then.

Thursday, February 14, 2013

Happy Valentine!


We wish you all a happy Valentine's day with origami hearts and an equation.

Let's make a plot in polar coordinates, of \( r = |\phi|^p\). The angle \(\phi\) goes from \(-\pi\) to \(\pi\),  and \(p \approx 1 \). Here is the plot, in processing, with \(\phi = 0 \) pointing up. Move the mouse to change \(p\)!

Mathworld has more equations for hearts, but none of them is as simple as ours. As \(p = 1\) gives a nice shape, \(p\) can be left out for an even simpler equation.


Sunday, February 10, 2013

Storage system for wrapping paper


Gift wrapping paper has always been a pain to store. Inspired by several similar arrangements on Pinterest, we made our own gift wrapping organization and storage system, on the inside of a clothes cabinet door.

For storing rolls of gift-wrapping paper, we used one of the (in Finland) ubiquitous Lanka & Muovi bathroom shelves, which consist of metal wire covered with a softer white plastic. We removed the lower parts of the two upper shelves with a wire cutter. The leftover wire stubs were smoothed down with a Dremel.


The result was two square ring-like supports over a deeper shelf, good for an almost infinite number of paper rolls!

Next, we used two Lanka & Muovi bars to make a holder for gift wrapping ribbon rolls. The bars (I really don't know what they're meant for in their original form) needed to be separated from the wall to make space for the ribbon rolls, we did this with some pieces of wood we had lying around.


We sawed off one end of the metal bars, and put in a hook for that end to rest on. This makes the ribbon rolls re-arrangeable without having to remove the entire thing!

Another bathroom shelf serves as storage for other gift-wrapping miscellanea: scissors, tape, gift bags, cards, markers...


Monday, January 14, 2013

New Hama Anti-Ad Sign

Our previous 'no advertisements' sign proved so popular that it was actually stolen (or anyway, it disappeared, most likely it fell down and was cleaned away or something). So I made a new one.
The new sign is made with Hama beads, like the old one. The sign has 01 White text on a 17 Grey background. I also made a glow-in-the-dark frame, with 55 Glow-in-the-dark green and 57 Glow-in-the-dark blue. It looks quite nice, a pop of bright color in the dark hallway, but it was very difficult to photograph!

The text, "Ei mainoksia kiitos!", is Finnish for "No advertisements please".

Wednesday, January 2, 2013

Wiring A Wireless Doorbell

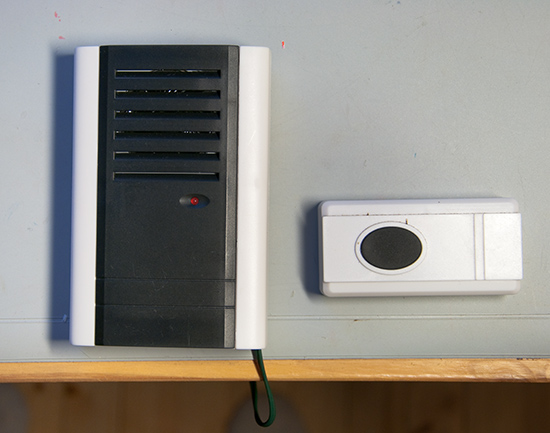
Wireless doorbell

My father-in-law installed a wireless doorbell. The ring-button outside the door contains a battery and a radio transmitter, the indoor unit contains a radio receiver and a speaker. It turned out that the battery in the ring-button outside does not like the cold Finnish winter, so it went flat. It seems this doorbell is best suited for indoors use...

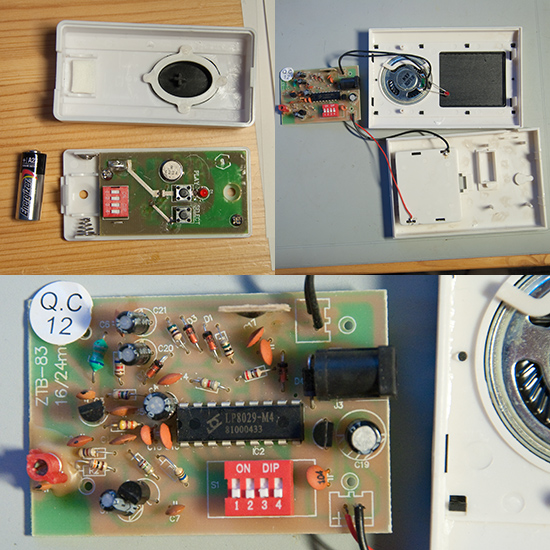
We planned to replace the transmitter with an old-fashioned switch with wires, and move the transmitter indoors. Opening up both the receiver and the transmitter first revealed a rather sloppy soldering job, then something about the design of the transmitter and receiver.

Wireless doorbell LP8029

The transmitter contains an encoder chip LP801B, while the receiver contains a LP8029 decoder. The radio circuitry appears to be built with discrete components in both units. The transmitter circuit board has two push-buttons: one for ringing and one for changing the melody. Only the ring-button is accessible when the cover is closed.

The receiver contains a melody generator chip, under a black plastic blob. Both units have a bank of four dip switches. Pressing the transmitter button causes a noise inside only if the switches in the receiver and transmitter are in identical positions, this is to avoid hearing the doorbells of all neighbors.

modified wireless doorbell

The initial plan was to move the transmitter inside, and connect the ring-button outside in parallel with the ring button on the transmitter. After a look at the Japanese LP8029 data sheet, I found a point in the receiver circuit that starts the ringing noise when momentarily connected to the positive supply. I wired the outdoors button to this point. The transmitter module is now needed only for selecting the melody, the receiver on its own works as an old-fashioned wired doorbell.

schematic

It was hard to find any information in English about the LP801B and LP8029 chips. An Austrian hacker found the same encoder chip in the transmitter for radio controlled mains switches. He figured out how to connected the transmitter to a microcontroller, to switch things on and off from a program.

Sunday, December 30, 2012

Five-sided Christmas Star Pastries


This is my version of a julstjärna, a traditional scandinavian Christmas pastry, which always has four arms. I wanted to expand the concept a bit.


Here is how to make it! The traditional four-sided julstjärna is made from a square piece of dough, so our five-sided ones are made from pentagons. A pentagon is of course a much less optimal shape for cutting up the dough sheet, but this is compensated for by the sublime beauty of the finished product!

Cut from each corner towards the middle, add a blob of plum jam. Fold one corner from each flap over the middle of the pastry. Adding some water to the surface as glue, squeeze until the folded corners stick together.


Sunday, December 9, 2012

Iridescent frying pan


Our stainless steel frying pan with colorful patterns. Frying stuff in this pan is not particularly nice, since everything, including bacon, seems to stick unless I add lots of fat. The colors offer some consolation, though. I suspect these colors appear due to light interference in a thin film of oxide on the pan's surface.


This picture of a Bismuth crystal from Wikipedia
shows the same effect. The crystal is covered with a thin oxide layer. When light reflected from the top and bottom of the oxide layer interfere, the colors appear. I like the G-shaped growth patterns in this picture even more than the rainbow coloration.

Sunday, November 18, 2012

Boxing the 'Berry


The raspberry router of an earlier post turned out to work well, but it definitely needs an enclosure. The fast & easy solution - put everything inside a plastic Smart Store box! (The same kind of box we modified for storing Legos.) The box contains a USB hard drive, as well as the Pi and GSM modem, so we can use the Pi as a file server.

The Pi, the network switch, the USB hub and the hard drive each has its own power supply, so we included a power strip in the box. The many power sources take up a lot of space in our current system. If all the devices could share one, the system would shrink considerably.

Each machine has its own LED, and at night, the whole thing looks like a box of holiday decorations.

The box is kept slightly ajar for the cables going into the box, which seems to provide enough ventilation as well. Measuring the raspberry's CPU temperature with
cat /sys/class/thermal/thermal_zone0/temp
consistently reports around 46 C.

This setup turned into a surprisingly nice media player as well, once I connected our old TV set to it. We have no keyboard connected to the Pi, so we just ssh to it and run the omxplayer. I plan to give XBMC a try later, but getting it set up on a standard raspbian systems seems rather involved.

The current setup is somewhat temporary - in the future, I hope to put everything inside the case of a desktop PC, to function as a power conserving and silent always-on server, independent of the main PC.

Sunday, November 11, 2012

Happy Father's day!

We have no cute ducks to post today in celebration, so we post a picture of bread instead.


This is what happens when one forgets to add yeast when operating the bread machine: a very flat bread. We are happy to report that it tasted good nevertheless, the structure was just a bit more compact than usual.

Thursday, November 1, 2012

Raspberry Router


I wanted to set up my Raspberry Pi as a 3G router for my small home network,  and as a file server too. It worked out nicely, so here are some notes and links that helped me.  My internet connection is provided by a USB GSM modem (Huawei E173), so the first task is to get this device running on the Pi. This was surprisingly easy, thanks to the sakis3g script.

I learned that once you start messing with the network, downloading new stuff gets tricky - so it's best to get everything at once.
sudo apt-get install ppp isc-dhcp-server usb-modeswitch 
and download sakis3g
wget "http://www.sakis3g.org/versions/latest/armv4t/sakis3g.gz"

EDIT: The Sakis3G web page is down at the moment, but a local copy of the script is here: sakis3g.gz (version 0.2.0.e).

The Pi can probably not supply enough current for the 3G modem through the USB ports (thanks for the tip), so I connected the modem through a powered hub. Without the hub, the modem did not work.


The sakis script was easy to use, it asked me to select my modem and then the network name (APN). When the connection works, one can write the selections in a configuration file to avoid having to enter them again. In sakis: "More options..." -> "Generate success report" shows a lot of info. Last in the list, there are the options needed to connect. Copy these (except  --console and --interactive) to the file /etc/sakis3g.conf with one option per line. Sakis does not like any extra whitespace on these lines. Now it should be possible to connect with  a simple sudo sakis3g connect.

I found a nice guide to setting up the pi as a router. This worked well for me, I just had to change which network interface is connected to the local network (eth0 for me) and which is connected to the outside (ppp0).


A small complication has turned up with the GSM modem. The modem is a multimode USB device, and must be switched into the correct mode before actually working as a modem. Sakis handles this automatically (using the usbmodeswitch program I installed above). The trouble is, that when the modem is switched, it changes its USB device ID. So the device option to pass to sakis is different the first time and any later time sakis is run without unplugging or powering down the modem in between.
The broadband company seems to drop the connection after 24 h. I think I will put a cron script for reconnecting at 5 in the morning or so. I came up with the following command for finding the current USB ID of  the modem and passing it to sakis.
sudo sakis3g connect USBMODEM=\
`lsusb | grep Huawei | sed 's/.*ID \([a-f0-9:]*\) Huawei.*/\1/'`
sed is a strange creature! grep finds the relevant line, and the sed command extracts the ID number between 'ID ' and ' Huawei'. This is of course assuming that exactly one huawei device is present.

I post some of the configuration files here. In this later post, I added a WLAN stick and got the Pi set up as a WLAN access point, these files are for a WLAN device as well. If you don't have one, just ignore those sections.
my /etc/networks/interfaces:

auto lo
iface lo inet loopback

auto eth0 #static address on eth0
iface eth0 inet static
address 192.168.50.1
netmask 255.255.255.0
network 192.168.50.0
broadcast 192.168.50.255
gateway 192.168.50.1

auto wlan0 #static address on wlan0
iface wlan0 inet static
address 10.10.0.1
netmask 255.255.255.0

And then /etc/dhcp/dhcpd.conf

ddns-update-style none;
default-lease-time 600;
max-lease-time 7200;
log-facility local7;

#for the eth0 subnet
subnet 192.168.50.0 netmask 255.255.255.0 {
range 192.168.50.10 192.168.50.250;
option broadcast-address 192.168.50.255;
option routers 192.168.50.1;
default-lease-time 600;
max-lease-time 7200;
option domain-name "local";
option domain-name-servers 8.8.8.8, 8.8.4.4; #Google DNS
interface eth0;
}

#for the wireless network on wlan0
subnet 10.10.0.0 netmask 255.255.255.0 {
        range 10.10.0.25 10.10.0.50;
        option domain-name-servers 8.8.8.8, 8.8.4.4;
        option routers 10.10.0.1;
        interface wlan0;
}

Wednesday, October 17, 2012

WiFi screen


We live on the edge of wireless reception. Even with an external antenna in the window, the signal was not quite strong enough and the connection was frequently dropped. Our friend Halza had the idea to use a strainer as a reflector. This trick works great for us too, and improves the reception considerably.
The WLAN antenna inside the strainer is one of these.

The WLAN signals are in the 2.4 GHz band, which means that one wave length is 12.5 cm. Already a reflecting plane, placed 1/4 wavelength (3.1 cm) behind the antenna should provide constructive interference and some signal gain. A parabolic reflector with the antenna in the focal point provides more. The strainer not exactly a parabola, but has the right general looks.

Lots of variants on this idea are available.

Sunday, October 14, 2012

Another batch of soap


We made another batch of transparent glycerin soap, using the same recipe as the last time. These above are the results.


We were so confident this time that we left the pot in the oven unguarded, and it boiled over! Or exploded, or something. Fluffy dry soap-clouds everywhere. At this point I was sure the batch was ruined! But we just scooped it all back in the pot, added some alcohol and melted it again, and everything turned out fine.


We used small soaps and scraps from the previous batch for decoration in the new ones - we arranged the old soaps in the forms, and poured new melted soap over. The aluminum foil is for keeping the round forms straight in the freezer, until the soap solidifies.


The soaps made in largish square forms I cut into three parts (for symmetry) to create reasonably size hand soaps.


Some of the finished soaps wrapped in strips of paper, as a gift wrap.

Friday, October 12, 2012

Cyborg bread

Bread with bread macine mixing blade stuck inside.

Sometimes, bread machine parts are left inside the finished product.

Wednesday, October 3, 2012

Thread Collection

My collection of sewing thread, small but pretty, deserves a post here as well. They're all Coats - some polyester Coats Duet, some Coats Cotton, and some are an ancient and discontinued polyester-cotton blend. I don't actually like sewing, but that doesn't keep me from wanting all the colors (pdf). Maybe if I could get into paper embroidery, to turn needlework into a form of paper craft...

Thursday, September 27, 2012

Printable Wall Calendar For 2013

Photos of a wall calendar for 2013.

Time for printing a new wall calendar for the coming year 2013. This one is similar to the one for 2012 - I made the days a bit bigger, and interwove the months to a continuous flow of days, to save some space. To identify the months, I gave each month its own color. Not sure how happy I am with these changes, but I'll just have to try it in real life and see what improvements I can come up with for 2014...

The calendar is on two pages, with January to June on the first and the rest on the second. The weeks begin with Mondays. Weekends are marked by a less bright white than the week days.

Download the pdf and print it on a regular printer. (The Google Docs viewer doesn't seem to understand transparency, so it doesn't show the month names or the weekend day boxes, but they'll be there when you print.)

The calendar is made in Inkscape, my favorite free vector graphics editor. The correct date/weekday arrangement for 2013 comes from Inkscape's Extensions -> Render -> Calendar function.
Older
Related Posts Plugin for WordPress, Blogger...