Showing posts with label consumer goods. Show all posts

Sunday, October 20, 2013

New disk for an old eee-pc


Our trusty eee-pc 901 was getting slower and slower. The 16G SSD in it was not very fast to begin with, but has definitely become slower over time. To keep the otherwise nice laptop running for a few more years, I decided to upgrade the SSD. The drive I ended up buying a 64G Super Talent FPM64GLSE. RunCore disks have a reputation for being faster, but they were also more expensive and hard to obtain. The eee-pc requires a PCI-E disk. There are also newer mSata disks available. These use a physically similar connector as PCI-E, but are not compatible.


A quick test of the Super Talent with iozone yielded the following results, in KB/s. The same settings were the same as when measuring SD card performance on the raspberry Pi earlier,
./iozone -e -I -a -s 50M -r 4k -r 512k -r 16M -i 0 -i 1 -i 2

                                   random random
reclen write rewrite   read reread   read  write
     4 17258   20110  12626  12623  12528   1457
   512 74590   41339 127710 127909 121887  74354
 16384 40403   75312 129705 129748 130483  40077

As with SD cards, the speeds that the manufacturers specify is the rate of sequential reading or writing of large contiguous blocks (Reading max 150 MB/s, writing max 100 MB/s is what they specify). Randomly writing small blocks of data is a much slower. Still, I am pleased with this result. Also in practice the upgrade had a large effect, the laptop feels much more responsive.

An annoyance with this drive is that it is configured as a slave. When booting the eee, it complains that no master disk is present and demands to press F1. When F1 is pressed, the boot proceeds normally, the unnecessary message just prevents the machine from booting unsupervised.

I installed Linux Mint Debian Edition on the new drive. I had Ubuntu 11.10 before, which started to show its age. I decided not to upgrade it, after experiencing Ubuntu 12.04 on another machine - I felt that the upgrade to 12.04 broke the user interface.

I am happy with Linux Mint. However, I came across a couple of problems during the installation. One that looked serious was that GParted reported errors about a recursive partition on the newly installed disk. I could not get rid of this message but decided to continue the installation anyway, and it turned out fine. To reduce the disk writes and the wear, I added noatime to the mount options for the disk in /etc/fstab.

Sunday, July 28, 2013

Yashica D resurrection


I found my uncle's old camera when sorting some old things, a Yashica D. It has been non-operational for the last 20 years, used mainly for projecting images through the viewfinder onto the ceiling with a flashlight. Now I started wondering if the camera could be used for photography again. The camera looked to be in a nice condition, but the shutter was stuck.

Kalle came to the rescue, armed with an excellent guide to disassembling the shutter on the Yashica D. We followed the guide, disassembled the shutter mechanism, and found that two shutter blades had stuck. We cleaned the blades and assembled the shutter again, and it worked!


While taking the camera appart, we had to unscrew a lens without damaging or scratching it. A bottle opener turned out to fit the lenses well and gave a suitably gentle but firm grip.


The shutter is designed in modules, with the self timer and the shutter speed regulator working as independent units. Each one is a kind of clockwork with several cogwheels in series. At one point we opened the wrong screw, and the shutter speed regulator came apart. Putting it back together again was a real challenge, as it contained several small wheels and springs. It was difficult to get all the pieces positioned correctly, so that the top cover could be put back on. What worked for us in the end was clamping a few pieces of cardboard to the desk, and to keep the timer module and its various parts in place with pins stuck into the cardboard.


I am very impressed by all the small mechanical parts in the shutter, especially considering that it all must have been designed without using computers. It was very pleasing when we got the camera put back together again, and to actually see it work. Kalle has already shot a couple of film rolls with it, here are a few samples.

The shutter disassembly guide by Dave Gauer was invaluable to us. We also found it useful to take photos of the parts in various stages of disassembly, in order to check the placing and orientation of the parts later when reassembling, and to keep the screws and small parts that came off in each step in a separate bowl.

Tuesday, April 9, 2013

ISDN adventures


I have an ISDN internet connection. It is slow, but happens to be provided for free. Getting ISDN set up under Linux has usually been a challenge for me, so when I got a fresh install working today with very little effort, I wanted to document the steps. Once it starts working, it usually works fine. (Special greetings to everyone in the University guest house in Marburg. Ask for a DrayTek modem and not the Fritz modem, which is a real pain when running Linux. Say you have ein Apple Computer).

The modem is a DrayTek miniVigor 128 (USB ID 0675:1688), a small box which connects to a USB port on the computer and to a phone for the phone line. The computer runs Ubuntu 11.10 (but I have used the setup on other versions, up to 12.04 without problems).

There are two ISDN systems in use for Linux. I have used the older one, in particular the HiSax driver supports my ISDN modem. The newer system is called mISDN. The two systems cause a conflict when both try to control the same device. I solved this by blacklisting the mISDN module, to prevent it from being loaded.

Add a file to /etc/modprobe.d/, for example /etc/modprobe.d/blacklist-misdn.conf, with the following lines:
blacklist mISDN_core
blacklist hfcsusb

Install some packages. This is easy if there already is an internet connection...
sudo apt-get install isdnutils-base ipppd

while installing, the installation script for ipppd asks for some information:

  • phone number to dial
  • user name (at your network provider)
  • password
The installer script then sets up the following files:
/etc/ppp/pap-secrets   #user name, password
/etc/ppp/chap-secrets  #user name, password

/etc/isdn/device.ippp0 #phone number, etc
/etc/isdn/ipppd.ippp0  #user name, channel bundling, etc

At this point I rebooted, after that I could dial with
isdnctrl dial ippp0
and had internet access. Not bad. But at this point, the connection uses only one of the two ISDN channels. To double the connection speed to amazing 128 kBit/s, one must set up channel bundling.

Edit /etc/isdn/ipppd.ippp0. Uncomment the line #+mp, and add /dev/ippp1 above it. So:
/dev/ippp1
+mp

Create a new device file for the two bundled devices
sudo cp /etc/isdn/device.ippp0 /etc/isdn/device.ippp0+1

Restart the isdn service after changing the configuration files, to make the new settings active.
sudo /etc/init.d/isdnutils restart

Now, it should be possible to dial first ippp0, then ippp1 and use both channels for fast surfing.
isdnctrl dial ippp0
isdnctrl dial ippp1

Note: if you receive the message
ippp0: Device or resource busy
it might be because the line is already connected, possibly since the default setting is to automatically dial when there is network traffic.

If the connection works so far, some adjustments can be done in the configuration files.

Turn on compression negotiation - perhaps it increases the bandwidth a little.
Comment out the command noccp in /etc/isdn/device.ippp0, remember to copy to the other name as well:
sudo cp /etc/isdn/device.ippp0 /etc/isdn/device.ippp0+1

In /etc/isdn/device.ippp0, adjust timeout for terminating an idle connection. It's only 60 seconds as default. If you are lucky and don't pay per minute, set it to something higher, for example 1800. Change this line:
isdnctrl huptimeout ${device} 60

DIALMODE=manual (instead of auto) disables automatic dialing, and gives you control of when to dial.

For convenience, one can make two shell scripts for dialing and hanging up:
dial.sh:
#!/bin/bash
isdnctrl dial ippp0
isdnctrl dial ippp1

hangup.sh:
#!/bin/bash
isdnctrl hangup ippp1
isdnctrl hangup ippp0

The configuration file architecture is probably specific to Debian-based distributions, but the step of blacklisting mISDN should help on any Linux with both ISDN systems. I tried to get the ISDN modem working with my Raspberry Pi router as well, but I never got that to work.

Saturday, February 23, 2013

Mini lanterns on a LED series


I made a set of small paper lanterns for a LED light series we have on a wall (indoors!). The paper lanterns are stylish and easy to make - they are a standard type of origami called 'fusen', which means balloon. I learned about them from the book The Simple Art of Japanese Papercrafts by Mari Ono. These little cubes are inflated after folding, and the air hole was very convenient for putting the fusen on a LED lamp.


The ones I made for this project are quite small. I used 7.5x7.5 cm paper, and the side of the cube is always a quarter of the side of the paper you started with. Since the LEDs don't give off any heat, the small size is not a problem. The origami paper diffuses the light very nicely, and the colors of the papers show up very bright.

Best of all, the color scheme infinitely adjustable, just by adding and removing colors according to seasons, holidays and moods!

Tuesday, February 19, 2013

WiFi access point with Raspberry Pi

Raspberry Pi as a WiFi router

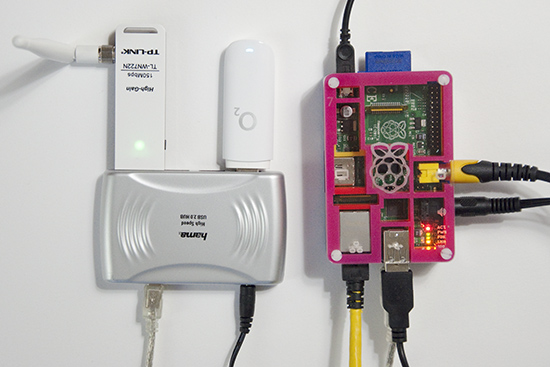
In a previous post, I talked about using the Raspberry Pi as a router. Now I wanted to add a WiFi device, and use the Pi as an access point as well. The Pi has three network interfaces: wlan0 is the newly added WLAN device, eth0 is my LAN, and ppp0 is a USB GSM modem connecting everything to the internet.

The primary reason for all of this is to have an access point for an Android phone. It turns out that an ad-hoc network is not enough - Android connects only to real access points (unless rooted and configured to be less suspicious). So the task now is to set up a Linux access point.

Software-wise, the access point functionality is provided by hostapd, which can be installed on the Pi easily.
sudo apt-get install hostapd
The hardware part is quite tricky though - not every wlan card works in access point, or managed, mode in Linux. The state of support in the various drivers can be found at  linuxwireless.org. Among the USB WiFi sticks, ath9k_htc seems well supported. I ended up buying a TL-WN722N, since it is supported by the ath9k_htc drier, and the external antenna looks efficient. It has worked very well so far, and is in daily use. Below, I describe the steps required for setting up everything. I am using Raspbian, but most of the things should work on any distribution.

The steps
Set up a DHCP server. Edit /etc/dhcp/dhcpd.conf and add the following lines.
subnet 10.10.0.0 netmask 255.255.255.0 {
range 10.10.0.25 10.10.0.50;
option domain-name-servers 8.8.4.4;
option routers 10.10.0.1;
interface wlan0;
}
If you already have an entry for DHCP on another subnet on another interface, make sure that the old subnet declaration also specifies for which interface it applies. Next, execute the following commands in a terminal, as root.

ifconfig wlan0 10.10.0.1    #bring up the interface
/etc/init.d/isc-dhcp-server restart #restart the DHCP server
echo "1" > /proc/sys/net/ipv4/ip_forward #turn on IP forwarding
iptables -t nat -A POSTROUTING -o ppp0 -j MASQUERADE #add a routing rule.

Replace ppp0 on the last line by the interface connected to the internet. For me ppp0 is a GSM modem.

Edit  /etc/hostapd/hostapd.conf . Add these lines (as a starting point):
interface=wlan0
driver=nl80211
ssid=YOUR_STATION
hw_mode=g
channel=11
wpa=1
wpa_passphrase=SECRETPASSWORD
wpa_key_mgmt=WPA-PSK
wpa_pairwise=TKIP CCMP
wpa_ptk_rekey=600
macaddr_acl=0

Next, start the access point by running hostapd.

hostapd -d /etc/hostapd/hostapd.conf

-d is for debugging output. -dd shows even more. Can be useful while setting up.

Now you should be able to connect to your new access point! Note that when hostapd quits, wlan0 looses it's IP address. So the IP must be set each time before hostapd is run.
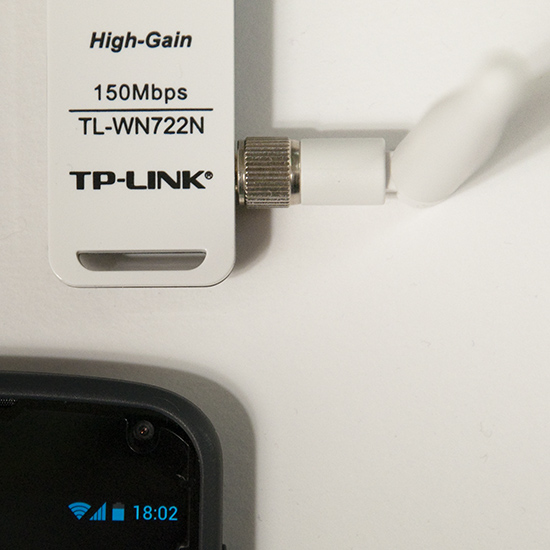
A TP-link TL-WN722N used as an access point

If everything works with this setup, it is convenient to automate the startup procedure, so that the access point is enabled at each boot.

To bring up wlan0 at boot, add the following to /etc/network/interfaces
auto wlan0
iface wlan0 inet static
address 10.10.0.1
netmask 255.255.255.0
To start hostapd automatically, add the command to /etc/rc.local:
hostapd -B /etc/hostapd/hostapd.conf
-B is for running in the background, as a daemon. Messages are logged in /var/log/syslog.

For setting up the IP forwarding stuff permanently, see my previous router post, and this nice guide.

So far I am very pleased with this setup. The only drawback is that the LAN on eth0 and the wireless network are separate and isolated from each other. Perhaps it's possible to construct a network bridge between the LAN and the WLAN interface. Then the two networks would appear as one, but this I leave for the next hacking session.

Add randomness!
Finally a note about a puzzling message from hostapd. When run with the flag -dd, hostapd works, but outputs
Add randomness: count=1 entropy=0
Add randomness: count=2 entropy=1
Add randomness: count=3 entropy=2
and so on, with a new line every second or so. I thought this had to do with /dev/random running out of random bits, but this is not the case.

Reading the source code of hostapd (version 1.0, since this is what I have on the Pi), this turns out to be a normal and harmless debugging message.  Hostapd keeps an internal pool of random bits (for encryption), in addition to the random numbers it reads from /dev/random. In different places in the program, random (or at least unpredictable) data is mixed into this pool. For example the signal strength of each received packet is used in this way. The "Add randomness" message is printed each time data is added to the pool. This is done in the function
random_add_randomness (const void *buf, size_t len)
in the file hostapd-1.0/src/crypto/random.c. So, in summary, the message can safely be ignored, and goes away if one runs hostapd without the -dd flag.

However, on a small system like the Pi, there is a risk of depleting /dev/random, especially just after a boot. I observed these messages from hostapd:
random: Got 18/20 bytes from /dev/random
random: Only 18/20 bytes of strong random data available from /dev/random
At this point I installed the program haveged,
sudo apt-get install haveged
Haveged is a program that helps with providing randomness or entropy, which it collects faster than the kernel does by default. I have not seen the message since then.

Saturday, February 16, 2013

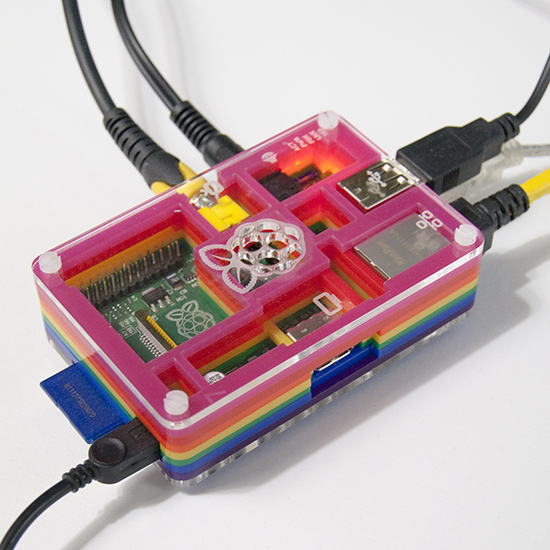
A Pibow case!

My Raspberry Pi in its new Pibow housing.
For Christmas I got a Pibow case. I like it very much! The Pi in the Pibow case feels nice and robust. The Pi gets slightly warmer in the case than without one, but this has not been a problem at all.

Monday, November 5, 2012

Circle Stickers - Lots of Dots


One great thing about Germany is the abundance of small, inexpensive round paper stickers - supposed to be used for archiving, I guess, but in my experience, they're also great for super-fast artwork creation, and for arranging nicely on a table.


On a side note, this company has a very impressive sticker repertoire. I haven't yet seen a shop that would sell all of these, not even in Germany.

Friday, October 26, 2012

Not a sixty degrees angle


The previous kind of salmiak wasn't, and this one isn't - maybe it just shouldn't be, a sixty degrees angle on the salmiak rhombus. Too bad! But at least it leaves a nice star-shaped space where the corners don't fill up in the above pattern.

Wednesday, October 17, 2012

WiFi screen


We live on the edge of wireless reception. Even with an external antenna in the window, the signal was not quite strong enough and the connection was frequently dropped. Our friend Halza had the idea to use a strainer as a reflector. This trick works great for us too, and improves the reception considerably.
The WLAN antenna inside the strainer is one of these.

The WLAN signals are in the 2.4 GHz band, which means that one wave length is 12.5 cm. Already a reflecting plane, placed 1/4 wavelength (3.1 cm) behind the antenna should provide constructive interference and some signal gain. A parabolic reflector with the antenna in the focal point provides more. The strainer not exactly a parabola, but has the right general looks.

Lots of variants on this idea are available.

Wednesday, October 3, 2012

Thread Collection

My collection of sewing thread, small but pretty, deserves a post here as well. They're all Coats - some polyester Coats Duet, some Coats Cotton, and some are an ancient and discontinued polyester-cotton blend. I don't actually like sewing, but that doesn't keep me from wanting all the colors (pdf). Maybe if I could get into paper embroidery, to turn needlework into a form of paper craft...

Monday, October 1, 2012

Jelly beans for fall

Colorful jelly beans.

I was thinking these might make an appropriate seasonal color scheme for the summer to early fall transition. The Jelly Belly flavors can be found here.

Monday, September 24, 2012

Emulsion separation time lapse

Fluid turbulence in a bottle of hairspray. Johanna bought a bottle of hair spray, consisting of two fluids, a clear and a white one. The product. The spray should be shaken before using, so that the two fluids mix. Above are some snapshots of turbulence achieved by gently shaking the bottle.

After a while, if left alone, the two fluids separate again. We've been quite fascinated by the mixing and re-separation processes.

This is a time lapse video of the hair spray, taken after shaking the bottle. The video starts with the emulsion completely white, that is, with the two solutions mixed. The whole separation process in the video takes about twenty hours.

From each frame in the video I cut a narrow vertical slice, always at the same position in the frame - this is apparently known as 'time slicing'. When these slices are placed beside each other a picture new is formed, where the horizontal direction represents time.


Three regions with different behavior can be seen in the picture. Here exponential curves have been fitted to the interface between the two fluids, in order to find the time constants. I expected to find a simple exponential time dependence, based on a vaguely remembered chemistry demonstration, but the result turned out to be more complex. When I searched for some explanation, I could only find complicated theories for how foams drain (pdf), and no mention of the simple exponential behavior.

Friday, August 17, 2012

Trying out the Raspberry Pi

I am a happy owner of a Raspberry Pi - a tiny (and really cheap) computer, capable of running Linux. Now I too am a part of the Raspberry revolution. I am just starting to try it out, but I already got our platform game running on it! More on the game will follow in a later post, first some notes on the Pi itself.

I decided to try out the Raspbian flavor of Linux on the Pi. I chose this for the hardware floating point support, and since the Raspberry Pi foundation recommends it.

I currently don't have an USB keyboard, so I hoped to access the Pi over the network with ssh. Luckily, Raspbian is set up with an ssh server running. The only things required is to make sure that the Pi gets an IP address when it boots, and then find out which IP it got so that you can ssh to it.

I connected the Pi to a laptop running ubuntu, and tried to use the network manager on the laptop to give the Pi an IP address with DHCP when it boots. Sadly, this did not succeed. Apparently the laptop Ethernet interface stays "down" as long as nothing is connected to it (the Pi is off), and the Pi got no IP address when it booted.
Fortunately it was easy setting up a DHCP server on the laptop manually:
1) Turn the network manager off, so it does not get in the way
2) sudo ifconfig eth0 192.168.0.2 #enable eth0, give it an IP address
3) sudo udhcpd -f
4) boot the Pi, wait a while.
5) udhcpd prints out the IP address it offers
6) ssh to the address. User name pi, password raspberry.


If you have the Pi connected to a TV or monitor, you will see the Pi printing some messages while it boots, and then launch the raspi-config program.  Without a keyboard raspi-config is not usable, but you can still access the Pi with ssh. Raspi-config seems to start automatically at each boot, until you have completed it once.  It can be run from a terminal at any time.  If one wants the Pi connected to the internet, some more networking is needed than what I describe above. A router would probably be the most convenient solution. I have had success with Windows "internet connection sharing".

EDIT: When trying to share an internet connection from an Ubuntu laptop to the Pi, this bug bit me. After the suggested work-around, sudo killall dnsmasq on the laptop, I could boot the Pi and it got an IP address. Then the next problem appears: how to find the IP address of the Pi? The Pi prints it on the TV or screen during boot. If no screen is connected one can use the nmap tool:
nmap -sP 10.42.0.1-254
this IP range being the one that Network Manager seems to offer. -sP tells nmap to ping all the hosts in the given range.

I have a PAL TV connected to the Pi. PAL needs a setting in the configuration file config.txt, located on the boot partition (the small, FAT one) on the SD card. Either edit this file on the card and uncomment the line
sdtv_mode=2
or use raspi-config on the Pi.


In this discussion and here I found interesting observations about which SD cards work well with the Pi. Apparently the fancy and expensive cards, called Class 10, are not the best since they are highly optimized for sequential reads and writes. This is good for photography but not for running Linux of the card. For this application, the speed of short random reads and writes is much more important, and these speeds may well be much better on cheaper cards of lower class. I got an 8 Gb Class 4 Sandisk SDHC card from the local Media Markt for 8 €. It seems to work well, but I have no serious benchmarks yet.

Monday, August 13, 2012

Checkered instruction beads

Checkered beads and a Fimo set.
A friend of mine bought a Fimo set, containing magenta, orange, black and white clay. We made some square checkered beads, following the instructions in the box - except for tweaking the colors a tiny bit: we mixed 1:5 white into the orange and magenta, to create a larger contrast for the black.

Wednesday, May 16, 2012

The New Grey

Since I had almost no grey Lego bricks in my old collection, I ordered some new ones from Pick-A-Brick. I realized that the color was different - the new grey bricks, on the left, make the old ones on the right look even older and dirtier than they are. According to Brickipedia, this new color, bley, has some blue in it and replaced the old one in 2004. A pity, since the old grey bricks are among the most stylish objects I know.

UPDATE. Fascinated by this shape, I made a painting of it.

Wednesday, April 18, 2012

Lego Storage


Organizing Lego bricks has always been something of a problem, if you're inclined to categorize. We took a clear plastic lidded box, a SmartStore Classic 31, and cut clear plastic sheets into the proper shape, to divide the box into sections. The sheets are polycarbonate Lexan sheets, 1.5 mms thick, just thin enough to be cuttable with household scissors. Five sheets were used in one direction, giving one compartment for each of the six traditional Lego colors. Compartment width was chosen to match the relative frequency of each color.


Where the sheets cross each other, we cut out a thin rectangle from both sheets, from the top to the center in one sheet, and from the bottom to the center in the other, to form a cross halving joint. It was helpful to drill a 2 mm hole at the inner edge of the rectangle, and then make two parallel cuts from the side to the hole. We fastened the plastic sheets with hot glue to the box. One long sheet was placed perpendicular to the six shorter ones, to stabilize and to separate thin and thick bricks.


Here is the box with the divisions in place and filled with our supply of bricks.

Wednesday, March 21, 2012

Robot cookies


Got robot-shaped cookie cutters as a present!


Made a couple of differently colored and flavored cookie doughs with the help of some very patient friends. Red - plum, orange - cinnamon, yellow - vanilla, yellow-green - ginger, green - lime, purple - cardamon.


Army of robots.
Older
Related Posts Plugin for WordPress, Blogger...