Showing posts with label patterns. Show all posts

Sunday, March 31, 2013

Masking & red cabbage dyeing Easter eggs

Easter eggs dyed with red cabbage

This year we colored Easter eggs with red cabbage juice. The patterns were made by masking the eggs with washi tape and candle wax.

Straining red cabbage

To extract the color from red cabbage, I boiled slices of five large leaves in water with some vinegar, for roughly 30 minutes, then removed the cabbage leaves by straining, and allowed the dye to cool. On the right is a piece of cotton string we boiled with the cabbage. It turned a very nice purple, I'm hoping the dye will stick to it.

Covering eggs with washi masking tape

To get patterns on the eggs, we covered some parts of them with washi masking tape. We also used molten candle wax, applied with a small paint brush.

Easter eggs soaking in red cabbage dye

The eggs were soaked in the cabbage dye for a few hours.

Dyed Easter eggs

Rinsing and removing the masking tape. The color is a nice blue, even though the cabbage was red and the dye purple! Red cabbage juice works as a pH indicator; it turns red when acidic and blue in alkaline solutions (and can even turn green or yellow for strong alkalines). It seems there is some chemistry going on in the shells.

The masking tape worked well - it kept the dye off the masked parts of the egg. Where two stripes of tape crossed each other an unexpected effect appeared: the upper stripe did not mask the egg perfectly just where it passed the lower stripe, giving an illusion of depth in the final pattern! The lines on the egg that appears to pass below another line were created where the tape stripe passed above another stripe.

The painted-on candle wax gave nice artistic effects!

Dyed Easter eggs

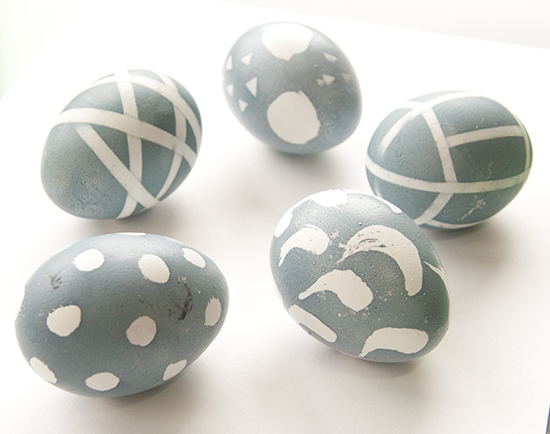
The finished eggs. Happy Easter to everyone!

Wednesday, January 30, 2013

Ice Waves


On a walk in my home town, I came across something which I at first couldn't understand at all - it was water slowly running down an icy rock face, which had created a weird mushroom-like structure.

Friday, January 25, 2013

Wintry Moiré


I saw an awesome Moiré pattern, formed from two perforated sheets of metal at slightly different distances from the camera. This gives a slight size difference, and therefore a slight frequency mismatch for the two sheets. It's nice how the original hexagonal pattern of the holes is repeated, hugely, in the Moiré pattern (much nicer than the boring examples on Wikipedia)!

Sunday, November 25, 2012

Dancer - a Processing test


A post on bitCraft inspired us to try the Processing language, a simple programming language for drawing interactive graphics and creating generative art. People have made some really fun and amazing stuff. Your program, called a sketch, can then be exported to all kinds of media platforms.

My program is a tweaked version of the program's own Brownian motion example. I added some cursor interaction and some forces, played around with the colors.

Moreover, I learned how to display the resulting processing sketch in blogger from here. Basically, I had to host the web page somewhere else, and then include it with an iframe.

Thursday, November 22, 2012

Girih Flower


The fivefold rotational symmetry of Girih tiles is just the thing for creating nice flowery shapes. Happy birthday Fredrik!

Friday, October 26, 2012

Not a sixty degrees angle


The previous kind of salmiak wasn't, and this one isn't - maybe it just shouldn't be, a sixty degrees angle on the salmiak rhombus. Too bad! But at least it leaves a nice star-shaped space where the corners don't fill up in the above pattern.

Saturday, October 6, 2012

Botany

Yesterday, I finished working on an idea for I had for learning to use Blender, an open-source program for making three-dimensional models. The result is called Botany, it's also on my art page.

Basically, I wanted to make something that utilizes and shows off the flat surfaces used in 3D modelling. Usually, one tries to hide away the sharp edges and use tons of triangles and effects to make it look organic. The other main idea was to make an image that's supposed to be two-dimensional, and not a snapshot of a 3D scene (which it is, too, nevertheless).

The idea came from designing boxes for the platform game. The thought is to draw simple sectors on a square, and shade them in a way that's compatible with a three-dimensional interpretation.
I thought up as many of these sectored squares as I could, and constructed and arranged them in Blender. The main part of the work was placing the nodes and connecting the right ones, to form the geometry I wanted.

As a bonus, I took some landscape snapshots as well. I used Blender's depth-of-field feature, which I probably don't know enough about, but as you can see, the result isn't that great on edges with a high contrast.

Sunday, September 16, 2012

Decagon Girih Solutions


In an earlier post, I wrote about two solutions for the pattern on the ten-sided Girih tile.

In the middle is the standard one, also in paper in Science. The one on the right, with straight lines, I saw in a post on Robodino about laser cutting Girih tiles. The one on the left I might have seen somewhere, or made up myself... Anyway, these are three different solutions with tenfold rotational symmetry.

Wikipedia says: "Most tiles have a unique pattern of girih inside the tile which are continuous and follow the symmetry of the tile. However, the decagon has two possible girih patterns one of which has only fivefold rather than tenfold rotational symmetry." - but it doesn't say which ones they mean.


After some playing around, I realized that there are all kinds of ways to connect the patterns while still (I think) following the rules. The ones above have only a twofold rotational symmetry. These are probably not the only ones, but with their low symmetry, they are not the most interesting...

Instead, I'm really happy about these! They all have fivefold rotational symmetry. The upper left one is the one we cut in acrylic, and the rest are new. The lower left one might not quite conform, since it has another type of crossing in the middle, but who cares? It's pretty!

All in all, these are eleven possible girih patterns for the decagon. Could Wikipedia be wrong on this?

Monday, August 27, 2012

Beaded bowl surfaces


Hexagons side by side forms a flat surface, with zero curvature. Reading Make Magazine's Math Monday, I learned that a pentagon among the hexagons makes the surface  curvature positive, like the surface of a sphere. A heptagon does the opposite - it creates a saddle surface, which has a negative curvature.

Here, I've built the same bowl-shaped trial surface from white glass beads and from Magnetic spheres. The surface is formed from hexagons, with a pentagon in each 'corner', to make the surface curve.

In an earlier post, I used only pentagons, which shapes the surface into a sphere.

Monday, August 20, 2012

Beads from scraps


Using leftover Fimo clay from the previous two projects, the instruction beads and the red flower cane, I made some sets of mixed striped beads. Below are the basic steps: rolling out the different-colored scrap pieces and bunching them together, then rolling out the bunch, cutting up and re-bunching and so on, twisting slightly, and the stripes get thinner.


When I was happy with the stripes, I cut the roll into pieces and formed round beads. Part of the roll I made thinner, and squared it before cutting, creating small elongated square beads.


Above are also shown some darker beads made with a similar method, with scraps from the instruction beads.


This single bead is made from leftovers of the petal in the red flower - the bead actually shows the pink-and-orange stripes which were supposed to show in the red flower as well, but the pattern got way to small when reducing...


Wednesday, August 15, 2012

Red flower cane beads


A flower cane made from the magenta and orange Fimo polymer clay from this set. The center is made of scraps from that checkered cane. First, I made some simple flat round beads by cutting slices from the reduced cane.


I then reduced the cane further, and put thin slices on a white clay sphere, made from half a Fimo strip. Twelve 1 cm slices fit covered the sphere nicely, in a dodecahedral formation.


Quarter-strip spheres were covered by six slices (cubic formation) and half-strip cylinders carried two rows of four slices. Leftover flower canes I stacked and rolled until they were tiny, wrapped them in white and cut into small flat beads.

Monday, August 13, 2012

Checkered instruction beads

Checkered beads and a Fimo set.
A friend of mine bought a Fimo set, containing magenta, orange, black and white clay. We made some square checkered beads, following the instructions in the box - except for tweaking the colors a tiny bit: we mixed 1:5 white into the orange and magenta, to create a larger contrast for the black.

Thursday, August 9, 2012

Bubbles III

bubbles in glasses
A beautiful phenomenon discovered while doing the dishes.

Thursday, July 26, 2012

File for laser cutting girih tiles


The laser cutter reads vector graphics; a red line means 'cut' and a black surface means 'engrave'. I made an svg file with the girih tiles placed side by side. You can download the file, visit your local Fab Lab, and make your own girih tiles! There is some room for improvement in the file - each side is cut twice, which is a waste of time and possibly burns the acrylic more than necessary. This file works fine, but it would be even better if one would remove those double lines.


View Fab Labs on Earth in a larger map

Contents of the file:


At the sides of each piece, there is a 'teeth' pattern, which I put there to make the pieces align better. Another 'innovation' is the double black line that forms the outline of a rope tied in an infinite knot, with a crossing at the sides of each girih piece. It turned out that it is possible to design the tiles so that the rope regularly passes above, then below, then above... for any pattern that one builds with them.

More pictures of the tiles and of the laser cutting process.

Wednesday, July 18, 2012

Laser cutting Girih tiles

Laser cutter
The laser cutter at Fab Lab Groningen.

Laser cutting girih tiles
The machine can both engrave and cut. It is almost magical to see one's design gradually appear as a physical object. Here the laser is cutting our girih tiles from a 3 mm acrylic sheet. The machine does the engraving first, one sees the knot pattern formed by the pieces appear. This is how girih patterns typically look when they are used for decoration, you see the knot pattern but not the borders between the pieces. Then the pieces are cut. The cut lines are quite different from the lines drawn on the tiles. Probably this is part of the reason for the complexity and beauty of girih patterns.

Laser cutting girih tiles
I find the Fab Lab concept fantastic, giving anyone the chance to use this kind of professional fabrication machines. They had 3D printers and a CNC mill as well. Not to mention the nice people at the Fab Lab, guiding me through the process of using the laser cutter!

Someone else also made a set of  laser cut girih tiles, at the Fab Lab in Lille. Some more pictures of our tiles, and the svg file for the laser cutter.

Wednesday, July 11, 2012

Acrylic Girih Tiles


We stumbled across the local Fablab on our holiday in Groningen, the Netherlands. We wanted to try their laser cutter, so I designed some girih tiles in Inkscape. These things have so many wonderful features, so more posts to are sure to follow - the laser cutting process, and the svg file for the laser cutting machine.


A nice collection of girih cut out of paper.
Older
Related Posts Plugin for WordPress, Blogger...