Saturday, February 23, 2013

Mini lanterns on a LED series


I made a set of small paper lanterns for a LED light series we have on a wall (indoors!). The paper lanterns are stylish and easy to make - they are a standard type of origami called 'fusen', which means balloon. I learned about them from the book The Simple Art of Japanese Papercrafts by Mari Ono. These little cubes are inflated after folding, and the air hole was very convenient for putting the fusen on a LED lamp.


The ones I made for this project are quite small. I used 7.5x7.5 cm paper, and the side of the cube is always a quarter of the side of the paper you started with. Since the LEDs don't give off any heat, the small size is not a problem. The origami paper diffuses the light very nicely, and the colors of the papers show up very bright.

Best of all, the color scheme infinitely adjustable, just by adding and removing colors according to seasons, holidays and moods!

Tuesday, February 19, 2013

WiFi access point with Raspberry Pi

Raspberry Pi as a WiFi router

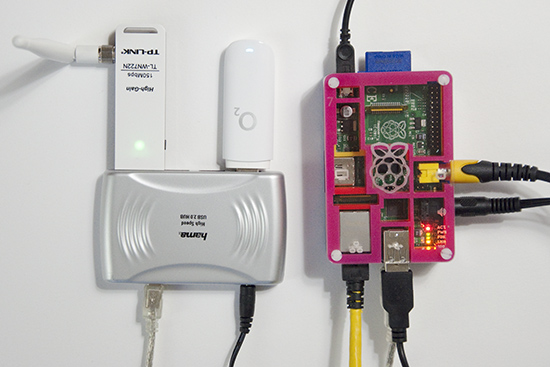
In a previous post, I talked about using the Raspberry Pi as a router. Now I wanted to add a WiFi device, and use the Pi as an access point as well. The Pi has three network interfaces: wlan0 is the newly added WLAN device, eth0 is my LAN, and ppp0 is a USB GSM modem connecting everything to the internet.

The primary reason for all of this is to have an access point for an Android phone. It turns out that an ad-hoc network is not enough - Android connects only to real access points (unless rooted and configured to be less suspicious). So the task now is to set up a Linux access point.

Software-wise, the access point functionality is provided by hostapd, which can be installed on the Pi easily.
sudo apt-get install hostapd
The hardware part is quite tricky though - not every wlan card works in access point, or managed, mode in Linux. The state of support in the various drivers can be found at  linuxwireless.org. Among the USB WiFi sticks, ath9k_htc seems well supported. I ended up buying a TL-WN722N, since it is supported by the ath9k_htc drier, and the external antenna looks efficient. It has worked very well so far, and is in daily use. Below, I describe the steps required for setting up everything. I am using Raspbian, but most of the things should work on any distribution.

The steps
Set up a DHCP server. Edit /etc/dhcp/dhcpd.conf and add the following lines.
subnet 10.10.0.0 netmask 255.255.255.0 {
range 10.10.0.25 10.10.0.50;
option domain-name-servers 8.8.4.4;
option routers 10.10.0.1;
interface wlan0;
}
If you already have an entry for DHCP on another subnet on another interface, make sure that the old subnet declaration also specifies for which interface it applies. Next, execute the following commands in a terminal, as root.

ifconfig wlan0 10.10.0.1    #bring up the interface
/etc/init.d/isc-dhcp-server restart #restart the DHCP server
echo "1" > /proc/sys/net/ipv4/ip_forward #turn on IP forwarding
iptables -t nat -A POSTROUTING -o ppp0 -j MASQUERADE #add a routing rule.

Replace ppp0 on the last line by the interface connected to the internet. For me ppp0 is a GSM modem.

Edit  /etc/hostapd/hostapd.conf . Add these lines (as a starting point):
interface=wlan0
driver=nl80211
ssid=YOUR_STATION
hw_mode=g
channel=11
wpa=1
wpa_passphrase=SECRETPASSWORD
wpa_key_mgmt=WPA-PSK
wpa_pairwise=TKIP CCMP
wpa_ptk_rekey=600
macaddr_acl=0

Next, start the access point by running hostapd.

hostapd -d /etc/hostapd/hostapd.conf

-d is for debugging output. -dd shows even more. Can be useful while setting up.

Now you should be able to connect to your new access point! Note that when hostapd quits, wlan0 looses it's IP address. So the IP must be set each time before hostapd is run.
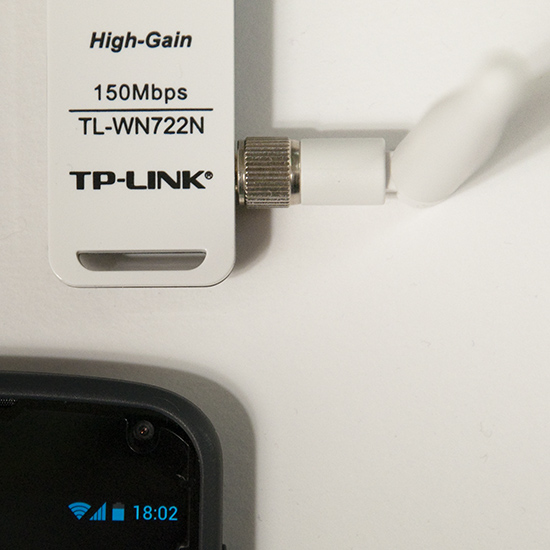
A TP-link TL-WN722N used as an access point

If everything works with this setup, it is convenient to automate the startup procedure, so that the access point is enabled at each boot.

To bring up wlan0 at boot, add the following to /etc/network/interfaces
auto wlan0
iface wlan0 inet static
address 10.10.0.1
netmask 255.255.255.0
To start hostapd automatically, add the command to /etc/rc.local:
hostapd -B /etc/hostapd/hostapd.conf
-B is for running in the background, as a daemon. Messages are logged in /var/log/syslog.

For setting up the IP forwarding stuff permanently, see my previous router post, and this nice guide.

So far I am very pleased with this setup. The only drawback is that the LAN on eth0 and the wireless network are separate and isolated from each other. Perhaps it's possible to construct a network bridge between the LAN and the WLAN interface. Then the two networks would appear as one, but this I leave for the next hacking session.

Add randomness!
Finally a note about a puzzling message from hostapd. When run with the flag -dd, hostapd works, but outputs
Add randomness: count=1 entropy=0
Add randomness: count=2 entropy=1
Add randomness: count=3 entropy=2
and so on, with a new line every second or so. I thought this had to do with /dev/random running out of random bits, but this is not the case.

Reading the source code of hostapd (version 1.0, since this is what I have on the Pi), this turns out to be a normal and harmless debugging message.  Hostapd keeps an internal pool of random bits (for encryption), in addition to the random numbers it reads from /dev/random. In different places in the program, random (or at least unpredictable) data is mixed into this pool. For example the signal strength of each received packet is used in this way. The "Add randomness" message is printed each time data is added to the pool. This is done in the function
random_add_randomness (const void *buf, size_t len)
in the file hostapd-1.0/src/crypto/random.c. So, in summary, the message can safely be ignored, and goes away if one runs hostapd without the -dd flag.

However, on a small system like the Pi, there is a risk of depleting /dev/random, especially just after a boot. I observed these messages from hostapd:
random: Got 18/20 bytes from /dev/random
random: Only 18/20 bytes of strong random data available from /dev/random
At this point I installed the program haveged,
sudo apt-get install haveged
Haveged is a program that helps with providing randomness or entropy, which it collects faster than the kernel does by default. I have not seen the message since then.

Saturday, February 16, 2013

A Pibow case!

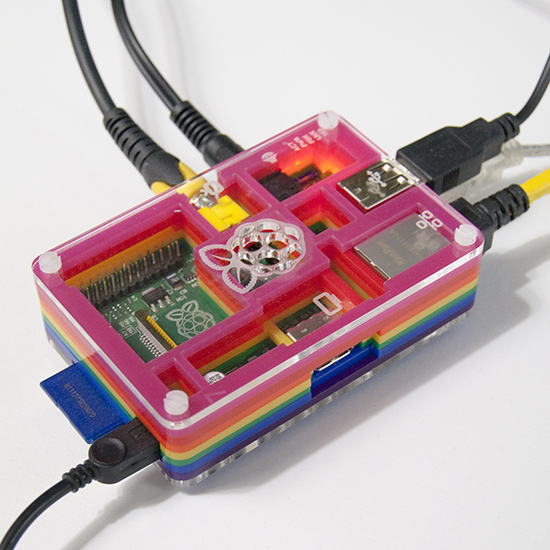
My Raspberry Pi in its new Pibow housing.
For Christmas I got a Pibow case. I like it very much! The Pi in the Pibow case feels nice and robust. The Pi gets slightly warmer in the case than without one, but this has not been a problem at all.

Thursday, February 14, 2013

Happy Valentine!


We wish you all a happy Valentine's day with origami hearts and an equation.

Let's make a plot in polar coordinates, of \( r = |\phi|^p\). The angle \(\phi\) goes from \(-\pi\) to \(\pi\),  and \(p \approx 1 \). Here is the plot, in processing, with \(\phi = 0 \) pointing up. Move the mouse to change \(p\)!

Mathworld has more equations for hearts, but none of them is as simple as ours. As \(p = 1\) gives a nice shape, \(p\) can be left out for an even simpler equation.


Sunday, February 10, 2013

Storage system for wrapping paper


Gift wrapping paper has always been a pain to store. Inspired by several similar arrangements on Pinterest, we made our own gift wrapping organization and storage system, on the inside of a clothes cabinet door.

For storing rolls of gift-wrapping paper, we used one of the (in Finland) ubiquitous Lanka & Muovi bathroom shelves, which consist of metal wire covered with a softer white plastic. We removed the lower parts of the two upper shelves with a wire cutter. The leftover wire stubs were smoothed down with a Dremel.


The result was two square ring-like supports over a deeper shelf, good for an almost infinite number of paper rolls!

Next, we used two Lanka & Muovi bars to make a holder for gift wrapping ribbon rolls. The bars (I really don't know what they're meant for in their original form) needed to be separated from the wall to make space for the ribbon rolls, we did this with some pieces of wood we had lying around.


We sawed off one end of the metal bars, and put in a hook for that end to rest on. This makes the ribbon rolls re-arrangeable without having to remove the entire thing!

Another bathroom shelf serves as storage for other gift-wrapping miscellanea: scissors, tape, gift bags, cards, markers...


Wednesday, January 30, 2013

Ice Waves


On a walk in my home town, I came across something which I at first couldn't understand at all - it was water slowly running down an icy rock face, which had created a weird mushroom-like structure.

Friday, January 25, 2013

Wintry Moiré


I saw an awesome Moiré pattern, formed from two perforated sheets of metal at slightly different distances from the camera. This gives a slight size difference, and therefore a slight frequency mismatch for the two sheets. It's nice how the original hexagonal pattern of the holes is repeated, hugely, in the Moiré pattern (much nicer than the boring examples on Wikipedia)!

Monday, January 14, 2013

New Hama Anti-Ad Sign

Our previous 'no advertisements' sign proved so popular that it was actually stolen (or anyway, it disappeared, most likely it fell down and was cleaned away or something). So I made a new one.

The new sign is made with Hama beads, like the old one. The sign has 01 White text on a 17 Grey background. I also made a glow-in-the-dark frame, with 55 Glow-in-the-dark green and 57 Glow-in-the-dark blue. It looks quite nice, a pop of bright color in the dark hallway, but it was very difficult to photograph!

The text, "Ei mainoksia kiitos!", is Finnish for "No advertisements please".

Sunday, January 6, 2013

Nut Domains


The square nuts from our Meccano set. Pushed together randomly, they form nice orientation domains - little areas where each square lines up with its neighbors.  Gaps open up between these domains, since they are not  lined up with each other.

The pattern reminds me of a city map, where rectangular buildings on a block are lined up, and then at a bigger street, the angle changes.

Wednesday, January 2, 2013

Wiring A Wireless Doorbell

Wireless doorbell

My father-in-law installed a wireless doorbell. The ring-button outside the door contains a battery and a radio transmitter, the indoor unit contains a radio receiver and a speaker. It turned out that the battery in the ring-button outside does not like the cold Finnish winter, so it went flat. It seems this doorbell is best suited for indoors use...

We planned to replace the transmitter with an old-fashioned switch with wires, and move the transmitter indoors. Opening up both the receiver and the transmitter first revealed a rather sloppy soldering job, then something about the design of the transmitter and receiver.

Wireless doorbell LP8029

The transmitter contains an encoder chip LP801B, while the receiver contains a LP8029 decoder. The radio circuitry appears to be built with discrete components in both units. The transmitter circuit board has two push-buttons: one for ringing and one for changing the melody. Only the ring-button is accessible when the cover is closed.

The receiver contains a melody generator chip, under a black plastic blob. Both units have a bank of four dip switches. Pressing the transmitter button causes a noise inside only if the switches in the receiver and transmitter are in identical positions, this is to avoid hearing the doorbells of all neighbors.

modified wireless doorbell

The initial plan was to move the transmitter inside, and connect the ring-button outside in parallel with the ring button on the transmitter. After a look at the Japanese LP8029 data sheet, I found a point in the receiver circuit that starts the ringing noise when momentarily connected to the positive supply. I wired the outdoors button to this point. The transmitter module is now needed only for selecting the melody, the receiver on its own works as an old-fashioned wired doorbell.

schematic

It was hard to find any information in English about the LP801B and LP8029 chips. An Austrian hacker found the same encoder chip in the transmitter for radio controlled mains switches. He figured out how to connected the transmitter to a microcontroller, to switch things on and off from a program.

Sunday, December 30, 2012

Five-sided Christmas Star Pastries


This is my version of a julstjärna, a traditional scandinavian Christmas pastry, which always has four arms. I wanted to expand the concept a bit.


Here is how to make it! The traditional four-sided julstjärna is made from a square piece of dough, so our five-sided ones are made from pentagons. A pentagon is of course a much less optimal shape for cutting up the dough sheet, but this is compensated for by the sublime beauty of the finished product!

Cut from each corner towards the middle, add a blob of plum jam. Fold one corner from each flap over the middle of the pastry. Adding some water to the surface as glue, squeeze until the folded corners stick together.


Saturday, December 29, 2012

Color mixes for pastel beads


I wanted to make colored translucent beads from Fimo polymer clay. I think the ready-made colored 'translucent' Fimo is too strongly pigmented, and not so translucent. The idea here is to reduce the amount of pigment, by mixing in unpigmented (i. e. 'white') translucent polymer clay.

Unpigmented clay is very soft, almost too soft to form into beads with any precision. The unpigmented clay in the reddish-violet beads above on the left was a bit dry, which made it much easier to control. But when baking, the dry clay produced a lot more of whitish flakes or stripes you can see in the picture above. I don't mind so much though, it looks a bit like some kind of stone.

I played around a bit with mixing different colors with varying intensity and lightness, to get the shades I wanted. The glass beads in the picture below served as inspiration and goal, to keep the colors subtle and counteract the temptation to create super-bright shades.


It's impossible to get an accurate idea of the color of these low-pigmented mixes while actually mixing them. Unbaked (in the upper half of picture above) they look almost completely white, since they get translucent only during baking. That's why a color chart comes in handy!


To read the chart: '1 blue + 1 violet + 32 white' means that I mixed 1 part translucent blue, 1 part translucent violet, and 32 parts 'translucent white' (i.e. unpigmented) Fimo polymer clay. In practice, I used one stripe (one eight of a packet) of unpigmented clay, and one 32th of a stripe each of the blue and violet clays. So one part is here just a tiny amount - unless you want to end up with piles of pastel clay.

The conical turquoise beads are made with a bead roller, the other ones I formed by hand. They were all sanded and polished after baking.

For the brownish ones, I mixed in a bit of green, as you can see, to get the saturation down. The result it a bit too reddish for my taste. My favorites are the darker turquoise and the bluish violet. Most of these semitransparent pastel colors would probably look nice layered with opaque white!

Sunday, December 9, 2012

Iridescent frying pan


Our stainless steel frying pan with colorful patterns. Frying stuff in this pan is not particularly nice, since everything, including bacon, seems to stick unless I add lots of fat. The colors offer some consolation, though. I suspect these colors appear due to light interference in a thin film of oxide on the pan's surface.


This picture of a Bismuth crystal from Wikipedia
shows the same effect. The crystal is covered with a thin oxide layer. When light reflected from the top and bottom of the oxide layer interfere, the colors appear. I like the G-shaped growth patterns in this picture even more than the rainbow coloration.

Sunday, December 2, 2012

Favorite Games: Nethack


Nethack A classic. You are an @-shaped hero, and your goal is to explore a dungeon filled with monsters (mostly letters) and treasures (gold $ and gems *) and other objects. I haven't played this one seriously for a while - it is much nicer to play on a full keyboard with a number pad, and I seem to usually sit at a laptop. This is a very addictive game, once you get past the initial steep learning curve. For this post we wanted a couple of screenshots, and once we started playing we got hooked again. We even learned to play without the number pad.

While exploring the dungeon one finds weapons (, armor [, and spell books +, and gets tougher by gaining experience and by learning new skills. Nethack is fun because it is so unpredictable. The ascii graphics is very simple, but the world of Nethack is complex. Monsters can interact with each other and with the world around them. You never know what will happen next, and the text description of the events in the dungeon forms an unpredictable story - sometimes a completely absurd fairy tale.

I grew up playing Nethack on DOS, and liked the way the map is drawn there with full lines for the walls. It is tricky to get this graphic mode to work in a unix terminal, for some reasons connected with different character sets. Anyway, there are several solutions. I installed the program konwert, and ran Nethack in this way on one of the text mode consoles (control+alt+f1):
nethack | konwert cp437-utf8
Then simply enabling IBMgraphics in the in-game options make the graphics look as it was meant to.


Taking screen shots of a text mode terminal is something I have never needed to do before, but it is possible with the snapscreenshot program. I ran it in this way, in a text-mode console, with Nethack running in console 1:
sudo snapscreenshot -f8 -c1 -x1 > screenshot1.tga
In an X-term window snapscreenshot does not work.

The Favorite Game series

Newer Older Home
Related Posts Plugin for WordPress, Blogger...