Tuesday, April 9, 2013

ISDN adventures


I have an ISDN internet connection. It is slow, but happens to be provided for free. Getting ISDN set up under Linux has usually been a challenge for me, so when I got a fresh install working today with very little effort, I wanted to document the steps. Once it starts working, it usually works fine. (Special greetings to everyone in the University guest house in Marburg. Ask for a DrayTek modem and not the Fritz modem, which is a real pain when running Linux. Say you have ein Apple Computer).

The modem is a DrayTek miniVigor 128 (USB ID 0675:1688), a small box which connects to a USB port on the computer and to a phone for the phone line. The computer runs Ubuntu 11.10 (but I have used the setup on other versions, up to 12.04 without problems).

There are two ISDN systems in use for Linux. I have used the older one, in particular the HiSax driver supports my ISDN modem. The newer system is called mISDN. The two systems cause a conflict when both try to control the same device. I solved this by blacklisting the mISDN module, to prevent it from being loaded.

Add a file to /etc/modprobe.d/, for example /etc/modprobe.d/blacklist-misdn.conf, with the following lines:
blacklist mISDN_core
blacklist hfcsusb

Install some packages. This is easy if there already is an internet connection...
sudo apt-get install isdnutils-base ipppd

while installing, the installation script for ipppd asks for some information:

  • phone number to dial
  • user name (at your network provider)
  • password
The installer script then sets up the following files:
/etc/ppp/pap-secrets   #user name, password
/etc/ppp/chap-secrets  #user name, password

/etc/isdn/device.ippp0 #phone number, etc
/etc/isdn/ipppd.ippp0  #user name, channel bundling, etc

At this point I rebooted, after that I could dial with
isdnctrl dial ippp0
and had internet access. Not bad. But at this point, the connection uses only one of the two ISDN channels. To double the connection speed to amazing 128 kBit/s, one must set up channel bundling.

Edit /etc/isdn/ipppd.ippp0. Uncomment the line #+mp, and add /dev/ippp1 above it. So:
/dev/ippp1
+mp

Create a new device file for the two bundled devices
sudo cp /etc/isdn/device.ippp0 /etc/isdn/device.ippp0+1

Restart the isdn service after changing the configuration files, to make the new settings active.
sudo /etc/init.d/isdnutils restart

Now, it should be possible to dial first ippp0, then ippp1 and use both channels for fast surfing.
isdnctrl dial ippp0
isdnctrl dial ippp1

Note: if you receive the message
ippp0: Device or resource busy
it might be because the line is already connected, possibly since the default setting is to automatically dial when there is network traffic.

If the connection works so far, some adjustments can be done in the configuration files.

Turn on compression negotiation - perhaps it increases the bandwidth a little.
Comment out the command noccp in /etc/isdn/device.ippp0, remember to copy to the other name as well:
sudo cp /etc/isdn/device.ippp0 /etc/isdn/device.ippp0+1

In /etc/isdn/device.ippp0, adjust timeout for terminating an idle connection. It's only 60 seconds as default. If you are lucky and don't pay per minute, set it to something higher, for example 1800. Change this line:
isdnctrl huptimeout ${device} 60

DIALMODE=manual (instead of auto) disables automatic dialing, and gives you control of when to dial.

For convenience, one can make two shell scripts for dialing and hanging up:
dial.sh:
#!/bin/bash
isdnctrl dial ippp0
isdnctrl dial ippp1

hangup.sh:
#!/bin/bash
isdnctrl hangup ippp1
isdnctrl hangup ippp0

The configuration file architecture is probably specific to Debian-based distributions, but the step of blacklisting mISDN should help on any Linux with both ISDN systems. I tried to get the ISDN modem working with my Raspberry Pi router as well, but I never got that to work.

Sunday, March 31, 2013

Masking & red cabbage dyeing Easter eggs

Easter eggs dyed with red cabbage

This year we colored Easter eggs with red cabbage juice. The patterns were made by masking the eggs with washi tape and candle wax.

Straining red cabbage

To extract the color from red cabbage, I boiled slices of five large leaves in water with some vinegar, for roughly 30 minutes, then removed the cabbage leaves by straining, and allowed the dye to cool. On the right is a piece of cotton string we boiled with the cabbage. It turned a very nice purple, I'm hoping the dye will stick to it.

Covering eggs with washi masking tape

To get patterns on the eggs, we covered some parts of them with washi masking tape. We also used molten candle wax, applied with a small paint brush.

Easter eggs soaking in red cabbage dye

The eggs were soaked in the cabbage dye for a few hours.

Dyed Easter eggs

Rinsing and removing the masking tape. The color is a nice blue, even though the cabbage was red and the dye purple! Red cabbage juice works as a pH indicator; it turns red when acidic and blue in alkaline solutions (and can even turn green or yellow for strong alkalines). It seems there is some chemistry going on in the shells.

The masking tape worked well - it kept the dye off the masked parts of the egg. Where two stripes of tape crossed each other an unexpected effect appeared: the upper stripe did not mask the egg perfectly just where it passed the lower stripe, giving an illusion of depth in the final pattern! The lines on the egg that appears to pass below another line were created where the tape stripe passed above another stripe.

The painted-on candle wax gave nice artistic effects!

Dyed Easter eggs

The finished eggs. Happy Easter to everyone!

Friday, March 15, 2013

Favourite Games: Widelands

widelands buildings
Widelands - a strategy game where you build up your civilization and defend it from your enemies. The best defense may well be striking first. Widelands is an open source game, and is said to be similar to Settlers II. The game is still evolving, but is already very enjoyable.

The game contains a complex economy, with different types of goods and buildings that produce goods or process goods from one form to another. In fact, building and then maintaining a working economy is the main part of the gameplay. There is also fighting with your neighbors, of course, but the battles take place with a minimal input. The only real choice is what to attack, and when to do it.

Widelands mines
Each warrior needs an axe. Axes are made in an axe factory using iron and coal. Iron is made by combining coal and iron ore in a smelter, these two resources one gets by constructing a mine at a suitable mountain site. However, the miners work only when they are well fed, which requires bread, meat, or fish, prepared into meals in a tavern. Every item produced is transported along roads between the buildings, so having an efficient road network in necessary for a productive economy. When the flow of wares becomes too much for the carriers, one can breed oxen for use as pack animals.

I like building my empire more than I like fighting the other players, so it suits me fine that the game emphasizes construction over battles. It feels nice to construct an efficient system of factories. In the game I played while writing this post, I ran out of wood in the beginning and then all construction projects ground to a halt. I had a small border battle with my green neighbor, but that war fizzled out when we both ran out of fighters. Then I lost some time before constructing an axe factory, since I believed it required a master blacksmith (which it doesn't). Another thing that caused trouble is that upgrading a building wastes all resources in it. (To save them, one has to order the stores to be emptied before upgrading. This problem is discussed on the bug tracker.) My greedy neighbors left me alone for quite some time even though my defenses were very thin, but eventually they defeated me by burning down my head quarter and storage. I'll get them next time though.
Widelands headquarter destroyed

There is a bit of a learning curve for this game, it takes time to find out how the wares should flow between the different buildings. There is some in-game help, in the form of a tutorial game and a list of all wares and how they are produced. The game music is quite monotonous. Because of it, the game is locally known as the meeh-meeh game. In all other respects, a great game! There is a multiplayer mode which I have not tried, but it sounds like great fun.

If you feel brave, try out the development version. The current development version, in preparation of release 18, still has some rough edges, but also notable improvements over the last stable release (17). The graphics is nicer and the colors have improved a lot. They were very saturated before, but are calmer now.


The Favorite Game series

Thursday, March 7, 2013

Red Snail Missing


I recently found a box of my childhood favorite candy, the 'Frog butterfly snail' ones - every eighties kid from Finland knows which ones I mean.

As a kid, it was always important that the box contained at least one candy of each of the ultimate correct types: red butterfly, yellow snail, and green frog. I'm happy to report success in the present case! In fact, the only combination missing from the box I bought was a red snail.

Monday, March 4, 2013

Fractures and Fractals


A wintry day I saw cracks in our parking lot asphalt with salt crystallized around the cracks. The patterns looked nice and reminded me of fractals, and gave a nice topic for a small Processing program.

Move the mouse over the picture to see different patterns! Click to zoom in, right-click to zoom out.


This is a drawing of the Julia set. Moving the mouse changes the (complex) parameter of the fractal. If you middle-click, you see a picture of the Mandelbrot set. There is an interesting and beautiful connection between the Mandelbrot and Julia sets, which we will get to after a very brief description of how the fractals are drawn.

Both fractals are drawn by iterating a complex function: \[z_{n+1} = z_n^2 + c.\] Starting with a value \(z_0\), one can use the equation over and over to find a long sequence of \(z\)s. The fractals are images of the complex plane, where each point is colored depending on how the sequence \(z_n\) behaves. Depending on \(c\) and on the staring value \(z_0\), the magnitude of \(z_n\) either stays bounded or explodes when \(n\) grows. If the sequence explodes, the color is chosen according to how many iterations it took for \(|z_n|\) to become larger than some suitable constant.

For the Mandelbrot fractal one always starts with \(z_0 = 0\), and choose \(c\) according to the point one wants to color. In the Julia fractal, \(z_0\) is the complex coordinate of the point you want to color, while \(c\) is a parameter of the fractal kept fixed for the whole image. Moving the mouse cursor over the image above changes the parameter \(c\).

The connection between the Julia and Mandelbrot fractals is this: The parameter \(c\) of the Julia fractal corresponds to one point in the image of the Mandelbrot set. When \(c\) is inside the Mandelbrot set (the central area traditionally colored black), the corresponding Julia set is connected. Try different points! It seems that the Julia set keeps the looks (the curlyness and fuzzyness) of the place one chooses in the Mandelbrot set. Points at the edge of the Mandelbrot set tend to be the most interesting.

While drawing this fractal, I learned that the color map is the key to getting nice pictures. It took some tweaking to get a nice-looking result. Coloring by the logarithm of the iteration count seems to be a good idea. You can have a look at the fractal source code here. Finally, one can choose some other complex function to iterate. Simply changing \(z^2\) to \(z^3\) or \(z^4\) gives interesting results.

Saturday, February 23, 2013

Mini lanterns on a LED series


I made a set of small paper lanterns for a LED light series we have on a wall (indoors!). The paper lanterns are stylish and easy to make - they are a standard type of origami called 'fusen', which means balloon. I learned about them from the book The Simple Art of Japanese Papercrafts by Mari Ono. These little cubes are inflated after folding, and the air hole was very convenient for putting the fusen on a LED lamp.


The ones I made for this project are quite small. I used 7.5x7.5 cm paper, and the side of the cube is always a quarter of the side of the paper you started with. Since the LEDs don't give off any heat, the small size is not a problem. The origami paper diffuses the light very nicely, and the colors of the papers show up very bright.

Best of all, the color scheme infinitely adjustable, just by adding and removing colors according to seasons, holidays and moods!

Tuesday, February 19, 2013

WiFi access point with Raspberry Pi

Raspberry Pi as a WiFi router

In a previous post, I talked about using the Raspberry Pi as a router. Now I wanted to add a WiFi device, and use the Pi as an access point as well. The Pi has three network interfaces: wlan0 is the newly added WLAN device, eth0 is my LAN, and ppp0 is a USB GSM modem connecting everything to the internet.

The primary reason for all of this is to have an access point for an Android phone. It turns out that an ad-hoc network is not enough - Android connects only to real access points (unless rooted and configured to be less suspicious). So the task now is to set up a Linux access point.

Software-wise, the access point functionality is provided by hostapd, which can be installed on the Pi easily.
sudo apt-get install hostapd
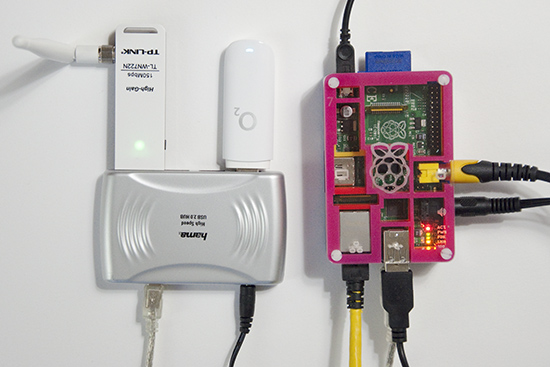
The hardware part is quite tricky though - not every wlan card works in access point, or managed, mode in Linux. The state of support in the various drivers can be found at  linuxwireless.org. Among the USB WiFi sticks, ath9k_htc seems well supported. I ended up buying a 
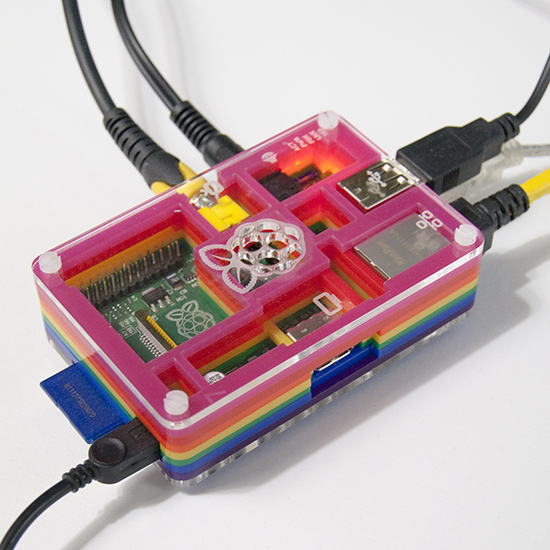
TL-WN722N, since it is supported by the ath9k_htc drier, and the external antenna looks efficient. It has worked very well so far, and is in daily use. Below, I describe the steps required for setting up everything. I am using Raspbian, but most of the things should work on any distribution.

The steps
Set up a DHCP server. Edit /etc/dhcp/dhcpd.conf and add the following lines.
subnet 10.10.0.0 netmask 255.255.255.0 {
range 10.10.0.25 10.10.0.50;
option domain-name-servers 8.8.4.4;
option routers 10.10.0.1;
interface wlan0;
}
If you already have an entry for DHCP on another subnet on another interface, make sure that the old subnet declaration also specifies for which interface it applies. Next, execute the following commands in a terminal, as root.

ifconfig wlan0 10.10.0.1    #bring up the interface
/etc/init.d/isc-dhcp-server restart #restart the DHCP server
echo "1" > /proc/sys/net/ipv4/ip_forward #turn on IP forwarding
iptables -t nat -A POSTROUTING -o ppp0 -j MASQUERADE #add a routing rule.

Replace ppp0 on the last line by the interface connected to the internet. For me ppp0 is a GSM modem.

Edit  /etc/hostapd/hostapd.conf . Add these lines (as a starting point):
interface=wlan0
driver=nl80211
ssid=YOUR_STATION
hw_mode=g
channel=11
wpa=1
wpa_passphrase=SECRETPASSWORD
wpa_key_mgmt=WPA-PSK
wpa_pairwise=TKIP CCMP
wpa_ptk_rekey=600
macaddr_acl=0

Read more about the configuration options here. Next, start the access point by running hostapd.

hostapd -d /etc/hostapd/hostapd.conf

-d is for debugging output. -dd shows even more. Can be useful while setting up.

Now you should be able to connect to your new access point! Note that when hostapd quits, wlan0 looses it's IP address. So the IP must be set each time before hostapd is run.

A TP-link TL-WN722N used as an access point

If everything works with this setup, it is convenient to automate the startup procedure, so that the access point is enabled at each boot.

To bring up wlan0 at boot, add the following to /etc/network/interfaces
auto wlan0
iface wlan0 inet static
address 10.10.0.1
netmask 255.255.255.0
To start hostapd automatically, add the command to /etc/rc.local:
hostapd -B /etc/hostapd/hostapd.conf
-B is for running in the background, as a daemon. Messages are logged in /var/log/syslog.

For setting up the IP forwarding stuff permanently, see my previous router post, and this nice guide.

So far I am very pleased with this setup. The only drawback is that the LAN on eth0 and the wireless network are separate and isolated from each other. Perhaps it's possible to construct a network bridge between the LAN and the WLAN interface. Then the two networks would appear as one, but this I leave for the next hacking session.

Add randomness!
Finally a note about a puzzling message from hostapd. When run with the flag -dd, hostapd works, but outputs
Add randomness: count=1 entropy=0
Add randomness: count=2 entropy=1
Add randomness: count=3 entropy=2
and so on, with a new line every second or so. I thought this had to do with /dev/random running out of random bits, but this is not the case.

Reading the source code of hostapd (version 1.0, since this is what I have on the Pi), this turns out to be a normal and harmless debugging message.  Hostapd keeps an internal pool of random bits (for encryption), in addition to the random numbers it reads from /dev/random. In different places in the program, random (or at least unpredictable) data is mixed into this pool. For example the signal strength of each received packet is used in this way. The "Add randomness" message is printed each time data is added to the pool. This is done in the function
random_add_randomness (const void *buf, size_t len)
in the file hostapd-1.0/src/crypto/random.c. So, in summary, the message can safely be ignored, and goes away if one runs hostapd without the -dd flag.

However, on a small system like the Pi, there is a risk of depleting /dev/random, especially just after a boot. I observed these messages from hostapd:
random: Got 18/20 bytes from /dev/random
random: Only 18/20 bytes of strong random data available from /dev/random
At this point I installed the program haveged,
sudo apt-get install haveged
Haveged is a program that helps with providing randomness or entropy, which it collects faster than the kernel does by default. I have not seen the message since then.

Saturday, February 16, 2013

A Pibow case!

My Raspberry Pi in its new Pibow housing.
For Christmas I got a Pibow case. I like it very much! The Pi in the Pibow case feels nice and robust. The Pi gets slightly warmer in the case than without one, but this has not been a problem at all.

Thursday, February 14, 2013

Happy Valentine!


We wish you all a happy Valentine's day with origami hearts and an equation.

Let's make a plot in polar coordinates, of \( r = |\phi|^p\). The angle \(\phi\) goes from \(-\pi\) to \(\pi\),  and \(p \approx 1 \). Here is the plot, in processing, with \(\phi = 0 \) pointing up. Move the mouse to change \(p\)!

Mathworld has more equations for hearts, but none of them is as simple as ours. As \(p = 1\) gives a nice shape, \(p\) can be left out for an even simpler equation.


Sunday, February 10, 2013

Storage system for wrapping paper


Gift wrapping paper has always been a pain to store. Inspired by several similar arrangements on Pinterest, we made our own gift wrapping organization and storage system, on the inside of a clothes cabinet door.

For storing rolls of gift-wrapping paper, we used one of the (in Finland) ubiquitous Lanka & Muovi bathroom shelves, which consist of metal wire covered with a softer white plastic. We removed the lower parts of the two upper shelves with a wire cutter. The leftover wire stubs were smoothed down with a Dremel.


The result was two square ring-like supports over a deeper shelf, good for an almost infinite number of paper rolls!

Next, we used two Lanka & Muovi bars to make a holder for gift wrapping ribbon rolls. The bars (I really don't know what they're meant for in their original form) needed to be separated from the wall to make space for the ribbon rolls, we did this with some pieces of wood we had lying around.


We sawed off one end of the metal bars, and put in a hook for that end to rest on. This makes the ribbon rolls re-arrangeable without having to remove the entire thing!

Another bathroom shelf serves as storage for other gift-wrapping miscellanea: scissors, tape, gift bags, cards, markers...


Older
Related Posts Plugin for WordPress, Blogger...